Your water heater works every single day without a complaint, which makes it easy to forget about until something goes wrong. A solid water heater maintenance checklist changes that. It turns a reactive headache into a simple annual routine that protects your investment, keeps energy bills in check, and prevents the kind of cold-shower surprises nobody wants. This guide walks you through everything: what to gather before you start, a step-by-step checklist for both tank and tankless units, a side-by-side comparison, and clear guidance on when to call a pro.
Table of Contents
- Key takeaways
- 1. What to gather before you start your water heater maintenance checklist
- 2. Annual maintenance checklist for tank water heaters
- 3. Annual maintenance checklist for tankless water heaters
- 4. Tank vs. tankless: maintenance comparison
- 5. Troubleshooting common water heater problems
- My honest take on water heater maintenance
- Let Mgkplumbing handle the hard parts 🔧
- FAQ
Key takeaways
| Point | Details |
|---|---|
| Annual maintenance extends lifespan | Regular flushing and anode rod checks can push your heater's life from 8-10 years to 12-15 years. |
| Know your heater type first | Tank and tankless models require different maintenance tasks, tools, and time commitments. |
| Temperature setting matters | Keep your thermostat at 120-125°F for both safety and energy efficiency. |
| T&P valve testing is non-negotiable | A valve that drips after testing needs immediate replacement to prevent dangerous pressure buildup. |
| The 50% rule guides replacement | If repair costs exceed half the price of a new unit, replacement is the smarter financial move. |
1. What to gather before you start your water heater maintenance checklist
Good preparation makes the difference between a smooth maintenance session and a frustrating mess. Before you touch anything on the unit, take 10 minutes to get organized.
Safety first. For gas heaters, turn the thermostat to the "pilot" setting before you begin. For electric models, flip the breaker off at the panel. Let the water in the tank cool for at least an hour before draining. Hot water under pressure can cause serious burns.
Know your heater type. Tank water heaters and tankless units have very different maintenance needs. Check the label on your unit and note the model, serial number, and installation date. That serial number often encodes the manufacturing year, which helps you track age.
Water quality matters more than most homeowners realize. If you live in an area with hard water, sediment builds up faster inside your tank. You may need to flush more frequently and inspect your anode rod more often than the standard annual schedule.
Here is what to have on hand before you begin:
- Garden hose (long enough to reach a drain or outdoor area)
- Flathead and Phillips screwdrivers
- Adjustable wrench or pipe wrench
- Bucket
- Plumber's tape (also called Teflon tape)
- Voltage tester (for electric units)
- Replacement anode rod (have one ready, just in case)
- Work gloves and safety glasses
Pro Tip: A DIY tank flush takes about 30 to 45 minutes. Block that time on your calendar once a year, ideally in the fall before heavy hot-water demand in winter.
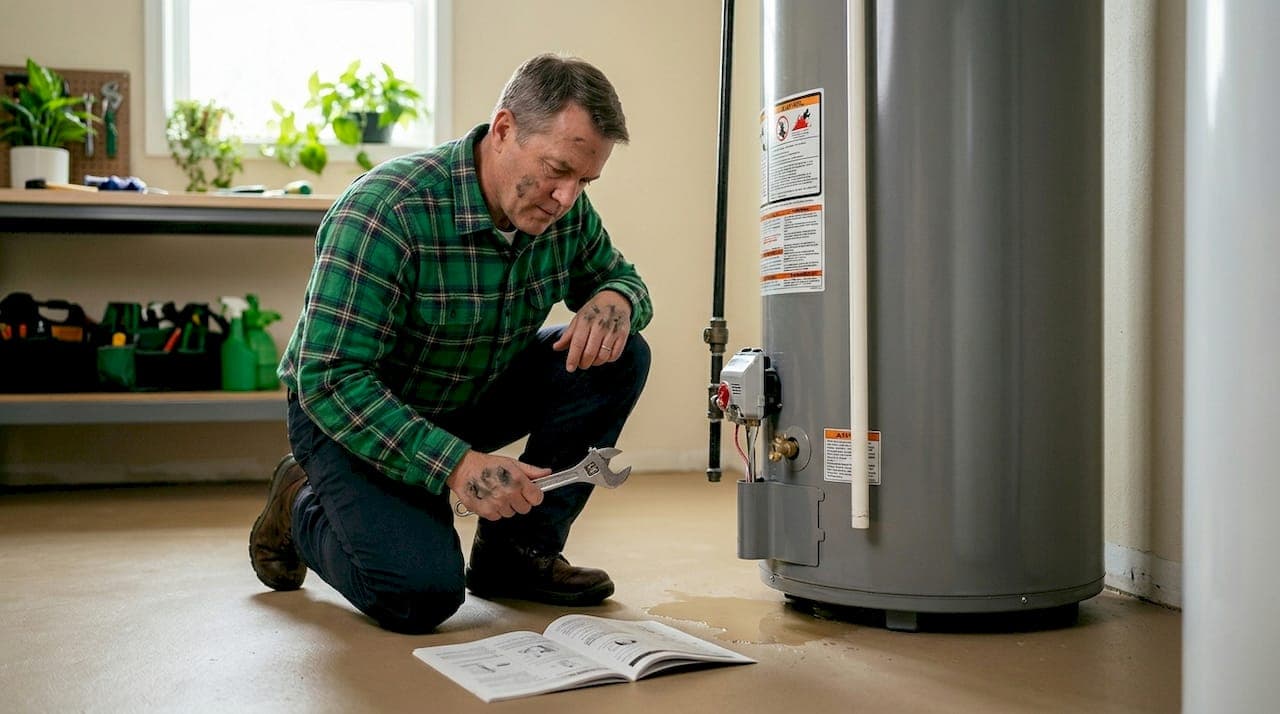
2. Annual maintenance checklist for tank water heaters
This is the core of preventive maintenance for water heaters with traditional storage tanks. Work through these steps in order.
- Turn off the heat source. Shut off gas at the thermostat or cut power at the breaker. Never drain a tank that is actively heating.
- Connect a garden hose to the drain valve. Run the other end to a floor drain, bucket, or outside. Open a hot water tap somewhere in the house to prevent a vacuum from forming.
- Open the drain valve and let the tank empty. Watch the water color. Cloudy or gritty water confirms sediment buildup.
- Cycle the cold water inlet to dislodge stubborn sediment. Repeatedly opening and closing the cold water inlet valve during flushing creates turbulence that breaks up deposits a simple drain misses. Do this two or three times until the water runs clear.
- Test the temperature and pressure (T&P) relief valve. Lift the lever briefly and let it snap back. You should hear a rush of water or steam. A valve that keeps dripping afterward is failing. A leaking T&P valve after testing signals immediate replacement is needed to avoid dangerous pressure buildup.
- Inspect the anode rod. This is the most overlooked step in any water heater upkeep checklist. Unscrew it with a socket wrench. If it is less than half an inch thick or heavily coated in calcium, replace it. Manufacturers recommend inspecting the anode rod every one to three years. In areas with aggressive water chemistry, consider a powered anode rod. Powered anode rods resist corrosion longer and can last the life of the heater under those conditions.
- Check and adjust the thermostat. Set it to 120 to 125°F. Lower than 120°F risks bacterial growth. Higher than 125°F wastes energy and increases scalding risk.
- Close the drain valve, refill the tank, and restore power or gas. Check for drips at the drain valve and all fittings before you walk away.
- Do a visual inspection. Look for rust stains, moisture around the base, and corrosion on fittings or the pressure relief pipe. Any of these warrant a closer look or a call to a licensed plumber.
- Check pipe insulation. Wrap exposed hot water pipes near the heater with foam pipe insulation if they are bare. This reduces heat loss and saves energy year-round.
Pro Tip: Avoid harsh chemicals when flushing. Harsh chemicals can damage the tank's glass lining and void your warranty. Stick to plain water and mechanical flushing.
3. Annual maintenance checklist for tankless water heaters
Tankless units are more energy-efficient but they are not maintenance-free. Their needs differ fundamentally from tank models, and skipping annual service shortens their lifespan fast.
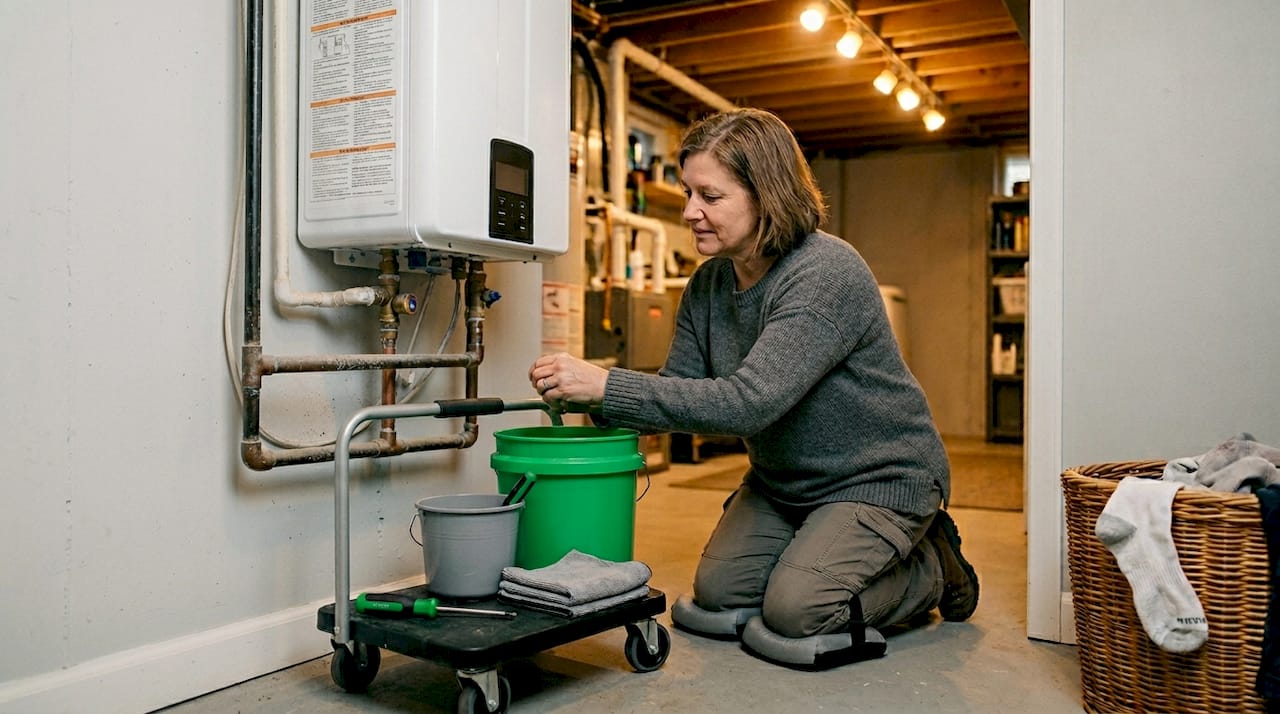
The biggest threat to a tankless heater is scale buildup on the heat exchanger. Hard water minerals deposit on the heating element over time, forcing the unit to work harder and reducing efficiency. Tankless water heaters require annual descaling and periodic inlet filter cleaning to maintain efficiency.
Here is what your annual tankless maintenance should include:
- Descaling flush: Use a submersible pump, two hoses, and a bucket of food-grade white vinegar or a manufacturer-approved descaling solution. Circulate the solution through the unit for 45 to 60 minutes. This dissolves mineral deposits the heat exchanger accumulates over the year.
- Inlet filter cleaning: Remove the cold water inlet filter screen and rinse it under running water. Replace it if it is damaged. Do this every three to six months if you have hard water.
- Check for error codes: Most modern tankless units have a digital display. Note any error codes before and after maintenance and cross-reference them with your owner's manual.
- Inspect the venting system: Check that exhaust vents are clear of debris, bird nests, or blockages. Restricted venting on gas units is a carbon monoxide risk.
- Test the flow sensor and pressure: If water flow seems weak or the unit takes longer to heat up, scale on the heat exchanger is the most common cause.
Pro Tip: For tankless water heater service, the descaling flush is straightforward for most homeowners. However, inspecting the burner assembly, gas connections, or internal electronics is best left to a licensed technician.
4. Tank vs. tankless: maintenance comparison
Understanding the differences helps you plan your time and budget realistically.
| Feature | Tank Water Heater | Tankless Water Heater |
|---|---|---|
| Primary annual task | Drain and flush sediment | Descale heat exchanger |
| Anode rod inspection | Yes, every 1 to 3 years | No anode rod present |
| Filter maintenance | Not applicable | Inlet filter every 3 to 6 months |
| DIY time per year | 30 to 45 minutes | 60 to 90 minutes |
| Typical lifespan | 8 to 15 years (with maintenance) | 15 to 20 years |
| Professional service cost | $150 to $300 annually | $150 to $300 annually |
| Energy efficiency | Lower (standby heat loss) | Higher (on-demand heating) |
Both types benefit from annual professional servicing that costs between $150 and $300 for residential units. That cost is a fraction of what an emergency repair or early replacement runs.
Pro Tip: If you are unsure which type of unit you have, check whether there is a large storage cylinder. Tank units are obvious. Tankless units are compact boxes mounted on the wall, usually near a gas line or electrical panel.
5. Troubleshooting common water heater problems
Catching problems early is the whole point of a good water heater repair checklist. Here are the warning signs to watch for and what they mean.
- Rumbling or popping noises: This is sediment hardening at the bottom of the tank. It reduces efficiency and can crack the tank lining over time. Flush the tank immediately.
- Rusty or discolored water: Rust-colored water from hot taps points to internal corrosion. This often means the anode rod is depleted and the tank lining is being attacked. If the rod is gone and the tank is corroding, replacement is likely the next step.
- Water pooling at the base: Small drips from fittings can often be tightened. Water pooling directly under the tank usually means the tank itself is leaking. A leaking tank cannot be repaired. It needs replacement.
- T&P valve dripping continuously: Do not ignore this. T&P valve failures after testing indicate aging or mineral clogging, not a maintenance mistake. Replace the valve promptly.
- Inconsistent hot water or longer recovery times: On tank units, this often signals heavy sediment. On tankless units, it points to scale on the heat exchanger.
When to repair vs. replace: Use the 50% rule. If repair costs exceed 50% of the price of a new unit, or if you have had multiple repairs in a short period, replacement is usually the better investment. Age matters too. A unit older than 10 years that needs a major repair is rarely worth fixing.
Never attempt to repair a gas valve, burner assembly, or electrical heating element without proper training. These repairs carry real safety risks. Call a licensed plumber when in doubt.
My honest take on water heater maintenance
I have worked with hundreds of homeowners across North and South Carolina, and the pattern is almost always the same. People call us after something goes wrong, not before. And nine times out of ten, the problem was preventable.
The two tasks that make the biggest difference are flushing the tank and checking the anode rod. Most homeowners have never touched their anode rod. Some do not even know it exists. That rod is literally sacrificing itself to protect your tank from corrosion. When it is gone, the tank starts corroding instead. By the time you notice rusty water, you are often looking at a replacement, not a repair.
I have also seen homeowners skip maintenance for years and then panic when the heater starts making noise. The good news is that even a neglected unit can often be brought back with a thorough flush and a new anode rod, as long as the tank lining is still intact.
My advice: set a reminder on your phone for the same time every year. Spend 45 minutes on the checklist. Buy a spare anode rod so you have it ready. That one habit, done consistently, is worth more than any fancy upgrade. Regular flushing combined with anode rod checks is one of the highest-impact routines you can build as a homeowner.
— Mike
Let Mgkplumbing handle the hard parts 🔧
DIY maintenance goes a long way, but some tasks genuinely require a licensed professional. That is where Mgkplumbing comes in. We are a full-service plumbing company, licensed, bonded, and insured across North and South Carolina, and we specialize in keeping water heaters running at peak performance.
Whether you need a professional annual inspection, anode rod replacement, T&P valve swap, or a full water heater tune-up, our team handles it with honest pricing and no surprises. We service both tank and tankless units, including electric water heater repair and gas models across the Charlotte and Rock Hill areas. If your unit is showing warning signs or you just want a professional set of eyes on it, check out our full plumbing services or give us a call. We also run seasonal service specials that make professional maintenance even more affordable.
FAQ
How often should I flush my water heater tank?
Flush your tank water heater at least once a year. If you have hard water, flushing every six months helps prevent heavy sediment buildup that reduces efficiency and shortens the heater's life.
What temperature should my water heater be set to?
Set your water heater thermostat to 120 to 125°F. This range prevents bacterial growth, reduces scalding risk, and keeps energy use in check.
How do I know if my anode rod needs replacing?
Remove the anode rod and inspect it. If it is less than half an inch thick, heavily corroded, or coated in calcium deposits, replace it. Plan to check it every one to three years as part of your annual water heater servicing.
What does a failing T&P valve look like?
A T&P valve that continues dripping after you test it has failed. This is a safety issue. Replace it right away, as a faulty valve cannot regulate dangerous pressure buildup inside the tank.
When should I replace my water heater instead of repairing it?
Use the 50% rule: if the repair cost exceeds half the price of a new unit, replacement is usually the better investment. Also consider replacement if your unit is older than 10 years and has needed multiple repairs recently.